Hip pain, achy muscles that turn numb, or persistent back pain that travels down the leg. Stretching your hips might help you resolve this. stretches the lower back’s muscles. Allow the pain to end.
People who must sit for extended periods of time at work or who frequently hold the same position may get hip discomfort and stiffness. a lower back ache And some folks continue to experience leg pain. Or frequently feel numb, all of which can be alleviated with hip and leg muscle stretching exercises. Let’s try practising anyhow.
– Place one leg on a chair with cushions.
– Bend your knees in a meditative position. Next, adjust your position such that your thighs are parallel to the cushion.
– Extend the opposite leg behind you.
– Straighten your back and then sag slightly. However, I was able to allow myself to lean back on the cushion if someone can’t sit with a straight back.
– Squat down and press down on your leg with your elbow. Keep all of your legs as near to the cushion as possible.
– Maintain the position for 10 to 30 seconds before alternating to the other side.
Position 1:
Take a seated meditation position with your feet together and your back straight.
– Take a deep breath in and raise your body slowly.
– After exhaling, slowly lean forward and hold the posture for five breaths. You’ll feel this position on the exterior of your hips.
Position 2
Do the butterfly position after that. Holding the toes with your hands, pull the soles of the feet towards the body.
– Inhale and raise your arms.
– After exhaling, sag slowly. The inner leg muscles will be relieved by this position.
Position 3
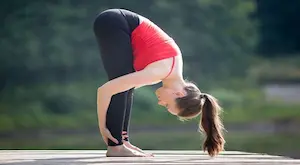
Stretch yourself up slowly, then extend your legs in front of you with your toes pointed up and your legs closely spaced.
– Breathe in and lift your hands in the air.
– After exhaling, stretch, bend over and touch your toes. Hold the position for five in-and-out breaths.
– Take a deep breath and raise both hands. Lower your hands as you exhale.
Position 4
Cross your right leg across your left leg while keeping your back straight. The feet are firmly planted on the ground with their soles.
Put your left arm up in the air. Afterward, use your elbow to support the outside of your right knee.
– Extend your hand and stroke the side of your hip.
– Slight rightward twist Behind the back, the right hand makes contact with the ground. Take five thorough, drawn-out breaths.
As you turn around, extend your right leg out in front of you. Afterward, veer to the left.
Position 5
With your feet hip-width apart and your knees bent, lie on your back.
– Clasp both ankles with both hands. Inhale as you position your arms next to your body.
– As you exhale, raise your hips. Stretch your body as much as you can to get your chest as close to your chin as you can. by squeezing the floor with the shoulder blades. Avoid allowing your shoulders to rise up along with your torso. Hold the position for some time.
– Next, lower your hips till they are flat on the ground.
– Kneel on your left knee, lift your right leg, and place it there.
– Reach out and place your right arm between your legs. Exhale as you place your hands together on your left knee.
– Breathe in and slowly flex your left knee.
Position 6
On the ground, lie down. Raise both knees.
– Raise your legs so that they are bent in front, near your belly.
– Extend your arms out in front of you, flat against your shoulders.
– As you exhale, bring your left knee to your left side. Try to keep your legs as level as possible with the ground. and turn to your right.
– Take a deep breath and raise your legs back to the starting position.
– As you exhale, press to the right side and downward. Try to keep your legs as level as possible with the ground. Turning to the left
– Switch sides 2-3 times, then maintain a straight spine. clutching knees with hands while inhaling
– As you exhale, bring your knees up to your chest.
– Get back into position and extend your right arm.
Position 1
– Prepare 1 bolster.
– Start with a crawling position. Step your right foot forward.
– Move your right foot behind your left wrist. Let your toes touch the back of your wrist. Knee touching back of right wrist
– Insert a bolster under your hips. To lock your feet so they don’t move backwards. and supporting the hips
– Slowly walk your hands forward. with the head tilted down This pose will help relax the muscles under our right hip. You may also feel tightness in the muscles in front of your left leg.
– Stretch your arms forward. Or you can elbow your feet. Whichever position feels more comfortable, hold the position for 1 minute or up to 5 minutes.
– Gently pull yourself back to the original position.
– Switch to do the other side.
Position 2
– In the crawling position
– Cross the right leg with the left leg. Let the toes point out to the side.
– Straighten your back, slowly exhale and lean forward. Both arms rested against the bed.
– Take a deep breath and slowly release the breath.
– Inhale, return to the position, then switch to the other side.
Position 3
– Slowly lie down on the bed.
– Set your left knee up. Place your right foot across the figure 4 and hug your knees and lean in towards your body.
– Take a long, deep breath and slowly relax your breath.
– Switch to hug the other knee.
Or if you want to stretch other muscles in the body as well. Try looking at these poses.